Friday, January 1, 2016

Thursday, February 26, 2015

Friday, February 20, 2015
One Little Word 2015!
Yes I am doing One Little Word this year! No!! I haven't actually started anything except to pick out my word:
HAPPY
Stay tuned for more information:- Teresa Collins Studio Gold album
- WRMK 8.5"x11" 9 pocket page protectors
Thursday, February 19, 2015
I made a planner, totally not my style
I admit it! I am a total bandwagonner on some trends. Last year in the midst of buying my house, I realized I had no organization at all. No way to keep track of due dates and appointments and just general time management chaos. So I got a planner. In October, I took it one step further. I decided my own custom calendar inserts. I loves them. They are fabulous and look elegant and make me happy. They exist in a cheap looking red DayRunner planner though. I hates it! I really hates it!
 I recently came across the Midori Traveler's Notebook via one of my favorite scrapbookers, Marcy Penner. I love the ease of the system and how easy it is to add and remove notebooks without the big bulk of rings. I thought PERFECT!! Then realized the pages are only 4.25" wide and my custom calendars that I created (literal blood, sweat, tears and many cuss words) and LOVED would not fit if I bought the notebook off the shelf.
My solution! Design my own! Mission accomplished!!! But the fabric I chose is totally not my style. So it shall sit and look lonely. It is a custom designed Midori style notebook which holds insert notebooks of 8.5" x 5.5" size with a little bit of wiggle room on the ends for tabs. It has interior pockets on the cover and three elastics. I am proud of it, I think I did a good job designing it. My sewing could have been better. Live and learn. Just not my style. Stay tuned for the next installment.
I recently came across the Midori Traveler's Notebook via one of my favorite scrapbookers, Marcy Penner. I love the ease of the system and how easy it is to add and remove notebooks without the big bulk of rings. I thought PERFECT!! Then realized the pages are only 4.25" wide and my custom calendars that I created (literal blood, sweat, tears and many cuss words) and LOVED would not fit if I bought the notebook off the shelf.My solution! Design my own! Mission accomplished!!! But the fabric I chose is totally not my style. So it shall sit and look lonely. It is a custom designed Midori style notebook which holds insert notebooks of 8.5" x 5.5" size with a little bit of wiggle room on the ends for tabs. It has interior pockets on the cover and three elastics. I am proud of it, I think I did a good job designing it. My sewing could have been better. Live and learn. Just not my style. Stay tuned for the next installment.
Tuesday, February 17, 2015
Pink Typewriter Cross Stitch
I have been itching to get back to cross stitch. The problem?!? The totally crappy designs in kits at my local craft stores. I mean seriously! I think most of the designs sold there are from when I originally learned to cross stitch in the late 80s.

The solution? I bought a pattern online and purchased the thread and cloth separately. Cross stitching is cheap! I had no idea how cheap. Fulfilling too! I am well on my way at getting this project finished in no time flat, just TV watching time.
I plan to frame this bad boy and use it as decor in my craft room. The teal/aqua of one of the hearts is a great match to the paint color of my craft room walls.
Details:
Pattern: Pink Typewriter from the Tiny Modernist Etsy Shop
Thread: DMC floss in 760, 3712, 3713, White, Ecru, 445, 907, 3849, 347, 3023, 3799
Cloth: Generic Aida 14
Monday, February 16, 2015
Rainbow Hat!
So funny story, I knit this hat twice!
I was cruising around the craft store with my friends, Holly and Dee Dee and we ran across this beautiful yarn from Lion Brand, Landscapes in Promenade. I had to have it, I had to make something with it. I was a woman on a mission to make myself a hat from this beautiful yarn.
 I picked out the Noro Spiral One Skein pattern from Ravelry (user name Angievcrafts) and away I went. I quickly cast on and then after the ribbing promptly frogged it cuz that is always how I roll. It was too small. I started again with an increase in stitches and quickly knit the whole hat. I made a mistake about halfway in and put a decrease in the wrong place but didn't notice until I was starting the decrease. After knitting it all up , I came to the heartbreaking conclusion that I had decreased too early. The hat was no where deep enough to fit on my head. Because the hat wasn't deep enough and the mistake halfway through and the general looseness of the stitches, I ripped it all out and did it all again. Pretty huh?
*tap, tap, tap* Anyone in there?
I admit it! I suck at blogging. I don't consistently craft so it is hard for me to get into a habit to put stuff on this blog. Plus it takes time. Time management is not one of my strong suits. I don't think anyone is reading this stuff anyways.
That all said, I want to blog... err, I mean I want to share what I am crafting. So here is my plan, I am going to make this place very photo heavy. When I start a new project, I am going to post a picture of it here with minimal details from my phone. I will try to remember to add work-in-progress posts too. When I finish, I will post those pictures if I remember. If I have time or the energy, I will go back and add the details to the posts.
Are you ready? (Am I ready? Can I do this?)
That all said, I want to blog... err, I mean I want to share what I am crafting. So here is my plan, I am going to make this place very photo heavy. When I start a new project, I am going to post a picture of it here with minimal details from my phone. I will try to remember to add work-in-progress posts too. When I finish, I will post those pictures if I remember. If I have time or the energy, I will go back and add the details to the posts.
Are you ready? (Am I ready? Can I do this?)
Monday, December 2, 2013
December Daily 2013 Thoughts and Cover
I am doing December Daily this year. So what is it? It is a mini-album dedicated to everything that happens in December. Ali Edwards was the originator of December Daily (henceforth known as DD2013) and she has a ton of resources on DD on her website. Many people do a picture a day, some just collect 25 holiday memories. I am using it as a way to force myself to do more celebrating/enjoying this holiday season.
 Connor is five this year and he is so into holidays. With him being my only child, I really want to take the time to focus on the holiday and his joy of it. I only get to experience a 5 year old at Christmas ripping into presents and being so excited once. I feel too often that I don't take the time to enjoy those moments but also to capture them. I hardly remember any of my childhood but what I do remember is tied to photos we have. They help to refresh the memory and I want a ton of that for Connor.
 The basis of my DD2013 supplies is the Studio Calico kit. I really love all the bits and pieces that come with the kit and the stamps are awesome. I am also taking the 25 Days class (no longer available) from Studio Calico so I received the bonus kit from them as well.
I have a scrapbooking shopping habit and it is bad. Of course I had to supplement what was already a ton of supplies. I am good like that. I picked up Lawn Fawn's Peace Love Joy collection and other bits and trinkets from other Christmas lines including Studio Calico wood veneers and Magical journaling tags, Elle's Studio Bits and Pieces, Simple Stories die cut cards, and Hambly transparencies.

The first thing I did was to make the cover. I started by taping off the linen portions of the album and painted the raw chipboard white. I then proceeded to obsess about what to put on the cover. I loved the look of the gold embossed wood veneer Ali Edwards has used on her blog. I used an aged gold embossing powder that I picked up at my local Ben Franklins on some wood veneer that I had laying around. I like the vintage/aged look of the embossing powder. I always have a hard time with aligning my alphas so I used the ribbon to line it up perfectly before sticking everything down.

 For the rest of the album, I used the Silver glitter ribbon to hide the rough transition from the linen to painted portion of the cover. I used the gold embossed paper from the kit as my base and layered paper from the Peace Love Joy collection on top. The rest of the cover used embellishments from several companies including Tim Holtz, American Crafts and Close to My Heart (rhinestone brad).
Overall, I am very pleased with my album. I could have done a better job with the painting the album but it is perfectly imperfect. I am going to eventually add a tag on the spine.
Are you doing December Daily? If so, link it up in the comments!!!
 Connor is five this year and he is so into holidays. With him being my only child, I really want to take the time to focus on the holiday and his joy of it. I only get to experience a 5 year old at Christmas ripping into presents and being so excited once. I feel too often that I don't take the time to enjoy those moments but also to capture them. I hardly remember any of my childhood but what I do remember is tied to photos we have. They help to refresh the memory and I want a ton of that for Connor.
I have a scrapbooking shopping habit and it is bad. Of course I had to supplement what was already a ton of supplies. I am good like that. I picked up Lawn Fawn's Peace Love Joy collection and other bits and trinkets from other Christmas lines including Studio Calico wood veneers and Magical journaling tags, Elle's Studio Bits and Pieces, Simple Stories die cut cards, and Hambly transparencies.

The first thing I did was to make the cover. I started by taping off the linen portions of the album and painted the raw chipboard white. I then proceeded to obsess about what to put on the cover. I loved the look of the gold embossed wood veneer Ali Edwards has used on her blog. I used an aged gold embossing powder that I picked up at my local Ben Franklins on some wood veneer that I had laying around. I like the vintage/aged look of the embossing powder. I always have a hard time with aligning my alphas so I used the ribbon to line it up perfectly before sticking everything down.

 For the rest of the album, I used the Silver glitter ribbon to hide the rough transition from the linen to painted portion of the cover. I used the gold embossed paper from the kit as my base and layered paper from the Peace Love Joy collection on top. The rest of the cover used embellishments from several companies including Tim Holtz, American Crafts and Close to My Heart (rhinestone brad).
Overall, I am very pleased with my album. I could have done a better job with the painting the album but it is perfectly imperfect. I am going to eventually add a tag on the spine.
Are you doing December Daily? If so, link it up in the comments!!!
Thursday, August 22, 2013
Letterpress Experiments
I apologize for the lateness of this post. I honestly thought I had already posted this information. Yes, dear readers, at night while I lie in bed trying to fall asleep I compose blog posts just for you.
Now that I have gotten being creepy checked off my blog checklist, time for the real reason I am posting, the results of my Letterpress experiments. So after my first pressing, I wasn't too impressed (har, har) with the plates that came in my starter bundle. They kinda suck and are not my style (not that I really know what that is). So I started thinking about ways to make my own plates. Please excuse the poor photos, I was inspired and didn't worry about lighting. Be glad I captured the process on film in the first place. :)
Now there a lot of ways to make an impression in paper with enough force. You can even use another sheet of die cut paper. You ask how I know this? Because I am lazy. I used to die cut several sheets at a time with my Big Shot in preparation for my CTMH workshops and sometimes the paper would slip and impress on the other pages. The problem with paper is that it is pretty much a one shot deal and adding ink is a messy and it doesn't transfer from paper to paper well.
My first experiment was to try letterpressing with a stamp. Totally didn't work. Even though I chose a stamp that was pretty solid and it did leave an impression, it was squished and malformed. That apparently wasn't going to work. I have letterpressed with embossing envelopes/Spellbinder Impossibilities dies so I wasn't about to give up.
Now I have horrible drawing and lettering skills, I always say that I am not a creative person I just copy really, really well. I decided to use my Silhouette and the sketch pens to line out the letters on Rough and Ready shrinky dink film. I chose Rough and Ready film as opposed to regular film because you can draw on the film with regular pens, markers and crayons. Based on previous experience, I know that Rough and Ready film shrinks to about 1/3 the size of the original cut. I used my Silhouette and the metallic sketch pens to draw out a quick word.
 |
| Preparing for a hand ache! |
I am glad I chose a font that is not very elaborate because I had to fussy cut these babies. After cutting each of the letters out, I popped them into the toaster oven that I have in my craft room just for shrinking some dinks. I put them on a piece of cardboard rough side up and placed them in the oven at about 275 degrees. This could all be in my head but I think they shrink more uniformly when the smooth side is down. Always watch closely as they shrink as it doesn't take long. They will first curl up and then lie back down flat. Once they are flat, I usually grab the cardboard out of the oven and place it on my table and smoosh them even flatter with a book.
 |
| Shrinky Dinks smothered in Liquid Glass |
I then glued them to some transparency film using Liquid Glass (the CTMH version of Glossy Accents) and waited about 15 minutes for it to dry. I could have used the Letterpress double sided adhesive to temporarily adhere the letters directly to the pressing platform but I didn't want to start sticking stuff to my platform and getting it all gooey right off the bat. It is also easier for me to line up letters if I line them up on grid paper. So I just used the closest washi tape to stick the plate to the top of the platform. I also washi-taped the paper to be impressed on the other side of the platform after lining it up using the grid.
 |
| Post Impression pic (I am cracking myself up) |
I inked the newly created plate using Tsukineko's Dew Drop Brilliance pigment ink in Starlite Silver just like a stamp. I then ran that bad boy though my Big Shot twice. As you can see in the picture, I got a nice impression and pretty even ink coverage. I didn't do a very good job of inking up the plate so make sure you have even coverage.
 |
| The final product.. Wheew! |
Now I just need to figure out how to cut shrinky dink film
with my cameo and I would really be in business. I attempted to do so but even cutting 4 times with a blade depth of 10, I didn't get all the way through the
film. Feel free to leave a comment if you have any questions!
Monday, August 12, 2013
Letterpress here I come!
Studio Calico announced a Letterpress class and of course I jumped right on it. I have been dying to try out letterpress techniques for quite a while. I managed to pick up a Lifestyle Crafts L Letterpress Starter bundle at my FAVE local scrapbooking store, Scrap N' Book, for a very good price.
Last week I was able to play around with it. I have had a Sizzix BigShot for years and I just used the letterpress platform with no modifications to the sandwich. Here is my first letterpressed project life card.
 Things I learned:
Last week I was able to play around with it. I have had a Sizzix BigShot for years and I just used the letterpress platform with no modifications to the sandwich. Here is my first letterpressed project life card.

- A little ink goes a very long way
- To get a nice deep impression, I need to add another sheet of cardstock behind the bottom grid plate.
- I need to buy the Lifestyle Crafts wipes because baby wipes weren't cutting it for ink cleanup.
Monday, June 17, 2013
A Taste of Honey blog giveaway!
So it turns out that the previous winner of the blog giveaway was in the UK and it was cost prohibitive to send the cards to her. I drew a new winner.
Congrats to Banu! You are the new winner. Please contact me by email at angie v crafts at gmail dot com and I will send these bad boys out.
Congrats to Banu! You are the new winner. Please contact me by email at angie v crafts at gmail dot com and I will send these bad boys out.
Project Life 2013 Week 14
Hey look! It is a week without many photos! I had to get creative! Most of my photos this week were also instagrams. Where is week 13 you ask? Well about that. Week 13 had a ton of pictures because of Easter so I STILL haven't done it yet. Yes, it has been two months and I have still not finished my Easter week. I will get to it. All the pics are in pockets including an insert. I just need to journal and embellish it. Maybe this week, maybe not. Whatevs.

So on to week 14, I actually did quite a bit of embellishing this week. This is the first week I used my typewriter on. At this point I hadn't quite figured out how to do my line spacing so the typed journaling is all a little bit squished using a single return.

I used a combination of cards from Studio Calico, MAMBI, the Jade Core kit, and Recollections. If you have a question on which card is which, just drop me an email. The title card uses Amy Tangerine's completely AWESOME Remarks alphabet. The letters are translucent and there are a ton of each letter in a pack.

Have I professed my love of labels on this website at this point? I bought a Print and Cut set from Studio Calico months ago. I used my Silhouette to print and cut them (obviously!) and they are fab. If I need more, I just print some more up. It is my favorite way to journal on my photos.

So on to week 14, I actually did quite a bit of embellishing this week. This is the first week I used my typewriter on. At this point I hadn't quite figured out how to do my line spacing so the typed journaling is all a little bit squished using a single return.

I used a combination of cards from Studio Calico, MAMBI, the Jade Core kit, and Recollections. If you have a question on which card is which, just drop me an email. The title card uses Amy Tangerine's completely AWESOME Remarks alphabet. The letters are translucent and there are a ton of each letter in a pack.

Have I professed my love of labels on this website at this point? I bought a Print and Cut set from Studio Calico months ago. I used my Silhouette to print and cut them (obviously!) and they are fab. If I need more, I just print some more up. It is my favorite way to journal on my photos.
Saturday, June 8, 2013
This is me album title page
I have spent the last couple of days working on my Studio Calico "This is Me" album. I created a new title page because I wasn't feeling the other one. Here it is in all its glory:
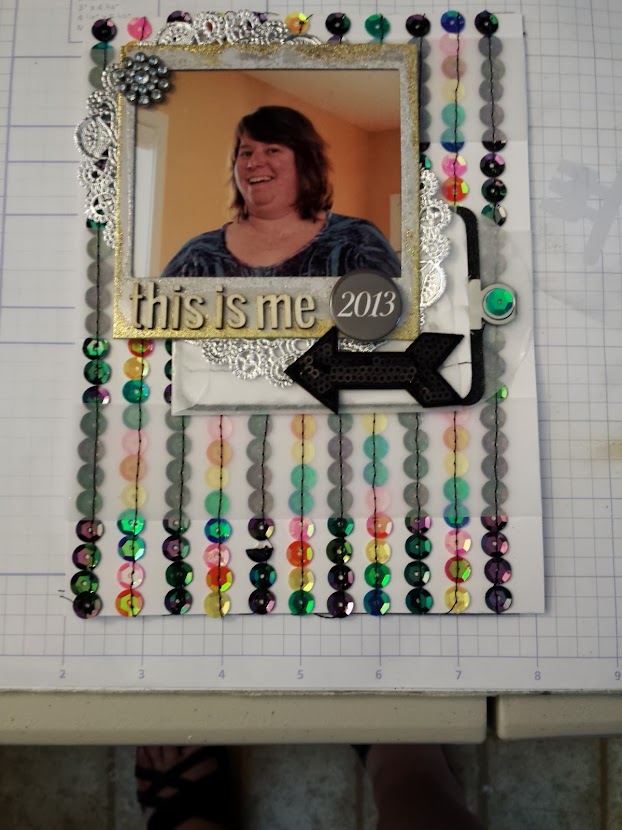
I used a ton of different techniques on this layout. The first and foremost is that I used a pencil to draw lines on a plain white sheet of cardstock. I then used Close to My Heart's Liquid Glass to adhere the sequins in a line. The sequins are from Cartwrights. They are so affordable and shipping was super fast. I will totally be ordering from them again.
After I had glued all the sequins down I realized the background was super busy and was going to distract from the picture. I used strips of velum to tone down the bright and shininess of the sequins in horizontal bands. I had a couple of sequins pop off the page so to make sure they stuck, I used my sewing machine to sew them down. It was my first time sewing on paper for reals so it was an adventure to say the least. I just used a regular old needle that came in the machine and used thread that I last used to sew my son's patches on his karate uniform. I love the look! I need to sew more and try zig-zag.
The polaroid frame is from Recollections and I first used Galaxy Gold ink on the edges. I wanted some more substantial metal feel to it so I used gold embossing powder on the outside edge and Stampendous's Stardust embossing powder on the inside edge.

I used a glassine envelope to create a pocket for my journaling. I created a tag out of so very heavy duty black shiny cardstock I picked up at a craft store long ago, no brand noted on it. I used my typewriter to type up something that I will call a mission statement for my album and added 3 sequins on white cardstock. The little metal tab is an old CTMH embellishment called a tiny tab. I added a sequin on it to tie it in to the rest of the page.
I created a little grouping of embellishments on the left corner of the photo by adding a SC badge and Heidi Swapp arrow. The title is a wood veneer alpha that was an exclusive in last month's Roundabout scrapbook kit from Studio Calico.
I had alot of fun working on this page. It really wound up my enthusiasm for creating more traditional layouts. Hopefully you will see more from me!
Friday, May 31, 2013
Project Life 2013 Week 11 and 12
Oy! I didn't realize how much time had gone by since I last posted! Here we are with weeks 11 &12. Week 11 I didn't have a ton of photos and week 12 my photos were all from one even pretty much so I combined them. I am taking it easy like that!

This layout features the first picture of my kitty, Morgan. I can't believe she hasn't made it in the book yet. Morgan just turned 15 years old and I can tell she is feeling her age. It is going to break my heart when she gets too old to go on.
I used the Jade PL Core kit pretty heavily on this layout. The title card, Morgan card and Living in the Moment card are all from those kits.

The True story card is from a Studio Calico kit and right now I am too lazy to figure out which one. Judging by the color I would say it is from Neverland along with the lucky card on the opposing page. Did you see how lazy I was with the photo in the bottom right corner? I did a half-ass collage in Picasa and then stuck crappy Recollection stickers right on top. I hate it but it is completed so I am not going to stress about it. I also half-assed on the Lucky card by not even journaling or embellishing and just sticking it in.

I did spend a little time being creative on the other side of the layout though. On the bottom right corner, I used 2 photos, a cut down page protector, washi tape and Jade journaling card to make a flip flap. I had previously cut down a Design A protector for an insert. I cut off one 4x6 inch space and washi taped it to a photo. With just a little trimming the photo fits in the pocket and gives a little interactivity to the layout.
 So... I am thinking about recording a video with my Picasa photo selection/editing/printing process? Anyone interested in seeing it?

This layout features the first picture of my kitty, Morgan. I can't believe she hasn't made it in the book yet. Morgan just turned 15 years old and I can tell she is feeling her age. It is going to break my heart when she gets too old to go on.
I used the Jade PL Core kit pretty heavily on this layout. The title card, Morgan card and Living in the Moment card are all from those kits.

The True story card is from a Studio Calico kit and right now I am too lazy to figure out which one. Judging by the color I would say it is from Neverland along with the lucky card on the opposing page. Did you see how lazy I was with the photo in the bottom right corner? I did a half-ass collage in Picasa and then stuck crappy Recollection stickers right on top. I hate it but it is completed so I am not going to stress about it. I also half-assed on the Lucky card by not even journaling or embellishing and just sticking it in.

I did spend a little time being creative on the other side of the layout though. On the bottom right corner, I used 2 photos, a cut down page protector, washi tape and Jade journaling card to make a flip flap. I had previously cut down a Design A protector for an insert. I cut off one 4x6 inch space and washi taped it to a photo. With just a little trimming the photo fits in the pocket and gives a little interactivity to the layout.

Tuesday, May 28, 2013
Project Life 2013 Week 10
Week 10 was a very basic week for me with minimal embellishments. I did stick to a very tight color story though with the use of Aqua, Navy and a dark pink.
 The cards came from Studio Calico's Neverland PL kit, the Becky Higgins Jade Core kit, and one Recollections card that I am thinking about replacing since it is pretty jarring and doesn't really fit in the more that I look at it.
 I continue to love the Basic Grey Studio Calico (SC) exclusive alphas. They are the perfect size for Project Life. I purchased the digital Neverland label set from SC and used the Print and Cut feature on my Silhouette. Can I say that is the easiest thing ever? I love having an endless supply of labels for my pictures.
 This week was also Taylre's birthday and the whole left side focuses on the day we spent with her. I am not going to tell you how long it took me to stamp "Happy Birthday Taylre" on the SC card. I was working outside in the sun on my deck and the stamp was hot and getting sticky. I would get the letters lined up and ready to put on my block to stamp them and then would hit one and they would go all crooked and it was a lesson in frustration. I love how it looks now though. Totally worth the frustration.
Thanks for looking!


Thanks for looking!
Friday, May 24, 2013
Project Life 2013 - Week 8 and 9
Week 8 and 9 were combined together because I didn't take a lot of pictures those weeks. And I am okay with this. I started Project Life as a way to document our lives but also because scrapbooking is fun and a creative outlet. I don't want it to become burdensome so I am taking a no-stress approach to it. I will continue to combine weeks if I don't have many pictures. I am also not stressing that I was almost 10 weeks behind. I will eventually catch up even if it is just me stuffing in photos and filler cards with minimal journaling.

Title card: This week I used a 4x6 from Studio Calico's Front Row PL kit and the alpha from the scrapbooking kit. I also used some of the awesome SC exclusive Basic Grey micro alphabet stickers that have been coming in our PL kits. I LOVE those alphas and could use them in every color. Right now I am hoarding them which is why you don't see them on many of my layouts. Once you put them on a page they are gone, right? I need to get over it and just use them!

Connor had his karate yellow belt promotion this week and I really went to town on scrapbooking the pictures. I used paper from the SC Front Row Scrapbooking kit but also Basic Grety Fact or Fiction alphabet stickers and some stars from Twine and Ink that were in the Block Party kit. The wood veneer is from Michael's Recollection line as is the quote card a couple of spaces below.

The most awesome, bright and happy washi tape is from Doodlebug Designs and I am so in love with it. The bright happy colors make me happy. I made sure to include a picture of Connor's beloved Skylanders in this week's spread. He was playing a modified version of CandyLand with them.
I think this is the first time Jordan shows up in the PL album. I definitely need to work on getting more pics of my stepkids in the limited time there are here at our house! Other small details include using more Studio Calico wood veneer (camera) and labels (night out pic). The Hello card is also from SC's Block Party PL kit.
Thanks for looking and happy scrapping!

Title card: This week I used a 4x6 from Studio Calico's Front Row PL kit and the alpha from the scrapbooking kit. I also used some of the awesome SC exclusive Basic Grey micro alphabet stickers that have been coming in our PL kits. I LOVE those alphas and could use them in every color. Right now I am hoarding them which is why you don't see them on many of my layouts. Once you put them on a page they are gone, right? I need to get over it and just use them!

Connor had his karate yellow belt promotion this week and I really went to town on scrapbooking the pictures. I used paper from the SC Front Row Scrapbooking kit but also Basic Grety Fact or Fiction alphabet stickers and some stars from Twine and Ink that were in the Block Party kit. The wood veneer is from Michael's Recollection line as is the quote card a couple of spaces below.

The most awesome, bright and happy washi tape is from Doodlebug Designs and I am so in love with it. The bright happy colors make me happy. I made sure to include a picture of Connor's beloved Skylanders in this week's spread. He was playing a modified version of CandyLand with them.
I think this is the first time Jordan shows up in the PL album. I definitely need to work on getting more pics of my stepkids in the limited time there are here at our house! Other small details include using more Studio Calico wood veneer (camera) and labels (night out pic). The Hello card is also from SC's Block Party PL kit.
Thanks for looking and happy scrapping!
Wednesday, May 22, 2013
Project Life 2013 - Week 7
Well it seems that I did a horrible job taking pics of my spread this week. I didn't get close ups of my left side nor closeups of both sides of the insert this week.
 Most of the cards this week come from the Front Row Project Life kit from Studio Calico. The title cards is from said kit and I added Recollections Glitter Alphabet letters to it to signify the week and the dates. I purchased some Studio Calico Kraft heart stickers and added them several times as it was Valentine's Day this week. I included both pics of my gift to Connor but also a pic of the gifts that Connor gave out to his daycare playmates.
 I received my Studio Calico order in this week and man it was a big order for me. I was sure to include a picture of the happy mail and also included the cute little card that was in the Scrapbook kit using enamel dots to mark which kits I bought. As you can see I bought not only the PL kit but also the Scrapbook kit and 2 addons.
I also took the time to journal about our dinner at Black Angus and the fact that our dryer and furnace both broke at the same time. It was so funny that I kept telling Chris my husband to take a picture I need it for the scrapbook. Luckily he complied even though the pictures aren't very good.
On Sunday we went to the park. Connor had been asking to go and it wasn't raining so off we went. I brought my DSLR camera along so it became a little mini photo shoot too. I used a Design G page protector as my insert. I love that it uses a mix of both vertical and horizontal photos so that I could get a little creative in my editting.
 I think my favorite picture is the one of Connor on the swing grinning away with Chris in the background watching, This weeks also includes some of the Project Life Jade core kit. The journaling card on the insert and the furnace card are both from Jade.
 Thanks again for reading!


I also took the time to journal about our dinner at Black Angus and the fact that our dryer and furnace both broke at the same time. It was so funny that I kept telling Chris my husband to take a picture I need it for the scrapbook. Luckily he complied even though the pictures aren't very good.
On Sunday we went to the park. Connor had been asking to go and it wasn't raining so off we went. I brought my DSLR camera along so it became a little mini photo shoot too. I used a Design G page protector as my insert. I love that it uses a mix of both vertical and horizontal photos so that I could get a little creative in my editting.


Tuesday, May 21, 2013
A Taste of Honey Giveaway Winner!
After taking out duplicates and my comments, we have 40 entries for the giveaway. I used the free option over at Random.org to pick a winner! It was comment number 23!!!
 Congrats to Sue B!
 Please email me your name and mailing address to angievcrafts@gmail.com and I will get this out right away!


Monday, May 20, 2013
Project Life 2013 Week 6
First of all I have to say THANKS to everyone who has come by and commented on my blog recently!!! I have really enjoyed having visitors. Sometimes it feels like I am just talking to myself on this thing. The Taste of Honey giveaway ends tonight and I will pick a winner tomorrow!
On to Week 6 of Project Life!
 This week I actually had a plan when it came to the color scheme. I had decided to use red and green based on the photo of Connor at Seattle Lunar New Year festival. Everything else was built off that card color-wise.
 The title card was created using the SC Front Row scrapbook kit and a Basic Grey Fact or Fiction die cut that I picked up at Joanns. I also used some AC glitter ribbon and a Sodalicious arrow from February's PL kit from SC. I love the card that I had Connor drew on. The fact that he doesn't draw full bodied people but just faces cracks me up. He also dictated a story to me and I wrote it around the edges.
 Nothing too fancy on the right side of the page. I journaled on a Cobalt Core Kit card about Connor going to the Lunar New Year with my aunt and uncle and got a little scrappy in the upper right hand corner with a pic of Chris and I going to the movies to see Warm Bodies.
Thanks for stopping by and taking a peek!
On to Week 6 of Project Life!


Thanks for stopping by and taking a peek!
Tuesday, May 14, 2013
What I have been working on!
So lately in addition to my Project Life, I have been working on a mini-album centered around me! Yes folks, it is all about me. This project grew out of a class I took at Studio Calico and taught by the talented Lexi Bridges. Supply-wise I went a little crazy.
 Yes that is the initial supplies I pulled for the project to begin with. I told you I went a little crazy. I am using a Studio Calico handbook for my album. Inside the album, I am doing layouts utilizing divided page protectors and handbook inserts as the base.
 The photo above is the first page of my album. It uses a Snippets Handbook Insert and several different papers from various SC kits. I also used Sundrifter die cuts.
 Above is page 2. Lots of different brands used here including Amy Tangerine Flair and Remarks alpha, MME Enamel dots, American Crafts Glitter Tape, Sodalicious Wood Veneer arrows and Heidi Swap letters. So far this is the only pages I have photographed of my album at this point. I have a page or two more completed but nothing to post. I plan to work on this album off and on as the year goes by.


Subscribe to:
Posts (Atom)